Smart Souven’Ears’ Saving

When budgeting for a trip to Disney, one thing that must be factored in is souven”ears” (or silverneers as my husband calls them for some reason – he’s a Yankee, so who knows? 😉  Everyone wants to bring home their own little piece of magic, a reminder of time spent in MagicMouseLand.

First of all, Clark, our 13 year old, is as much about Disney as is his Mama.  He wants mucho momentos to sort through once he’s home.  Not only does he share Mama’s Disney obsession, he also shares Mama’s caviar taste on a cracker budget; and of course, since he has no job, he has very little concept of the value of money.  So leave it to my think-ahead husband to solve these problems.

Throughout the year, my husband empties his pockets and puts his loose change into a jar.  Then a week or so before we leave for MouseLand, he sits down with Clark & they roll all the change in the jar, and that is Clark’s souvenir money, no matter the amount.  Once it was $200+, once it was over $300!  This solves a myriad of problems.  Mom & Dad aren’t weakened to fork out the dough at every whine & whim, losing track of how much is being spent, and since Clark has a limited amount of spending money, he’s more choosy about what he takes home. He knows that once the money is gone, it’s gone.  Mom & Dad won’t be opening their wallets for anything else.  This cuts down tremendously on the stress, except for Clark, who has an awfully hard time making the choice of what to place on the counter!

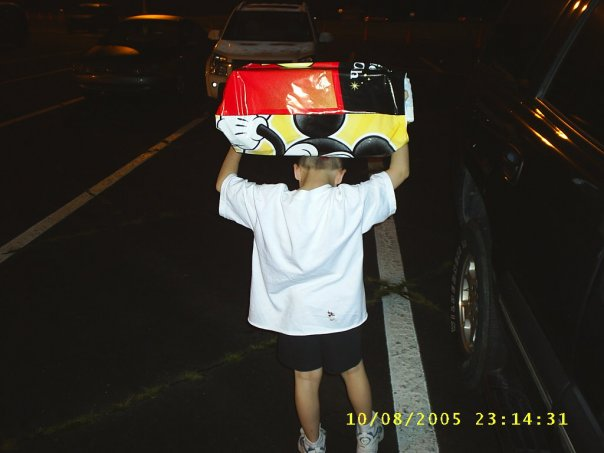
I can’t believe in all their years of doing this, I’ve never taken a picture of My Boyz (as I affectionately call hubby & son) rolling the change for the trip.  As I conclude this article, I vow to digitally freeze this moment in time on our next go round, and have priceless souven-ears of my very own!

In the midst of a tough economy at home and abroad, I trust this has given you an idea to make your next visit less stressful and more affordable!

DeAnna, along with her husband and teen-age son, lives in Wiggins, Mississippi, and has a passion for all things Disney. She is always eager to share the knowledge she has gained from her many trips to Walt Disney World, and has helped numerous people in their vacation planning to realize it’s not an unattainable dream.  Her must-dos on every trip are Pirates of the Caribbean, Rockin’ Roller Coaster & a stolen moment of quiet with her “Boyz” (as she affectionately calls them) having a pastry from Boulangerie in Epcot World Showcase’s France. Disney is so much a part of her life, that she & her husband were married in front of Cinderella’s Castle, and she says it doesn’t get any more magical than that………

Share

Tips for Using the Affordable Disney Vacation Planning Worksheets

You told me you wanted worksheets to help you budget your Disney World vacation, and ways to stay organized with all the vacation details. Well your wish is my command. 🙂

Late last week I finally finished 3 new worksheets for you and uploaded them to the site. If you haven’t yet seen them, you can find links to all 3 on the Planning Worksheets page.

While there is a quick overview of each on that page, I wanted to take today’s post to elaborate just a bit and provide a tutorial that will hopefully help you to use them. But first, a few things for you to know…

First, they were all created as Excel worksheets, so if you have Excel installed on your computer, they should open up just fine. Each link goes directly to the worksheet: simply save each one into a folder on your computer so you can find it later! If you don’t have Excel, no worries because you can download the free program Open Office, that allows you to create documents, PDFs, spreadsheets and more that are all fully compatible with Microsoft Office. And again, it’s free! If you are going to use Open Office, once the program is downloaded, you should be able to open the worksheets in one of two ways:

  1. Click on each worksheet and it will open automatically in Open Office (you may need to “tell” it what program to use to do this) or
  2. Open Open Office and click on the spreadsheet icon. Once that opens, go to the file menu in the upper left corner, click “open” and select which worksheet you want to use…and it should open automatically.

OK, worksheets open: here’s the second thing you will want to know. Each sheet has cells where you can input your own information, while the rest of the sheet you cannot edit. Sorry, but since I created the sheets, I didn’t want changes to them going all over cyberspace…but still having my name on them. Hope you understand. 🙂 The important thing here though, is that the things you need to edit for your own use, you can.

The last thing to know is what you do with them once you are finished. Basically, if you have saved your edited version, then when you get ready to leave on your vacation, you can print out what you want to take with you. Even better, smartphones and blackberries make it easy to have an electronic version with you stored in your phone! Just send it to your phone, save it so you can pull it up when needed, and voila, your vacation details in the palm of your hand. 🙂 I do love technology sometimes……

Now let’s take a look at each sheet.

ADR Information Sheet

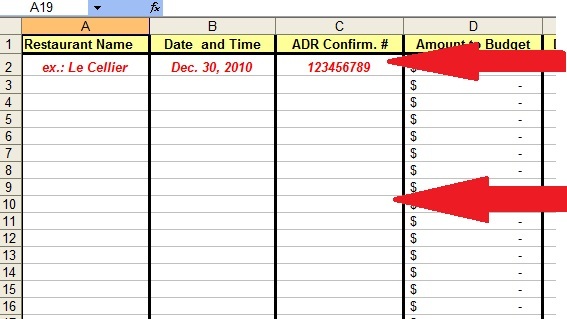
First there is the ADR Information Sheet: On this sheet, the Column Headings and top row with examples of how to fill it out (in red) you cannot edit. The rest of the sheet you can. So as you plan your Advanced Dining Reservations, use this little sheet to have all the information for each ADR together, in one place. I have found this truly important to have, in case I need to doublecheck, or change an ADR. I also like to make sure that I have noted when the ADR was made and who I spoke to (in case there is a problem). This sheet will also help you keep track of Disney Dining Plan table service credits, and/or how much you need to budget to eat there, as well as if there is a credit card hold for the restaurant.
Vacation Itinerary

The Vacation Itinerary is a formal version of what I have used on every Disney vacation (or every vacation for that matter) that I have ever taken. (In it’s earliest forms, it was hand written in a small notebook that came with me everywhere on our vacation.) I really like to have all my details for each day, all in one place, so I can at a glance, know who/what/where/when/why we are doing anything. This includes budget: I have found the absolute best way to make sure we don’t go over budget on a vacation, is to know how much I have to spend each day, and on what. That’s how much we take with us, the rest stays back in the safe at the room.

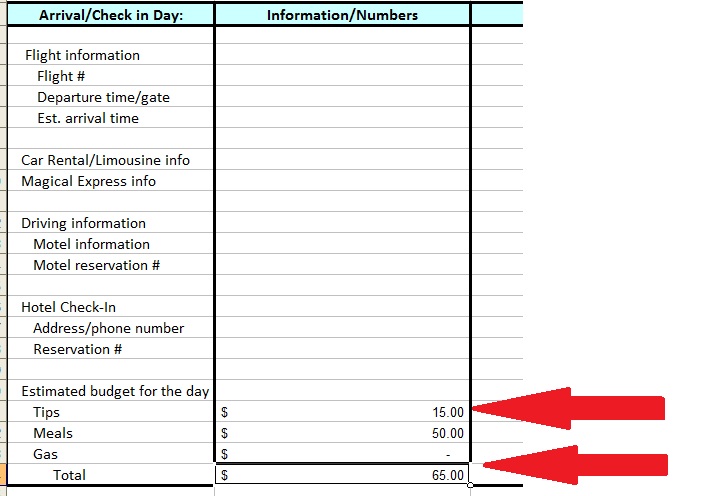
So the Vacation Itinerary basically has one sheet per day. You start with your Arrival Day, which has your travel information, hotel reservations/location, as well as a section for estimated expenses for the day. The left hand column you cannot edit, everything under Information/Numbers and Notes you can.
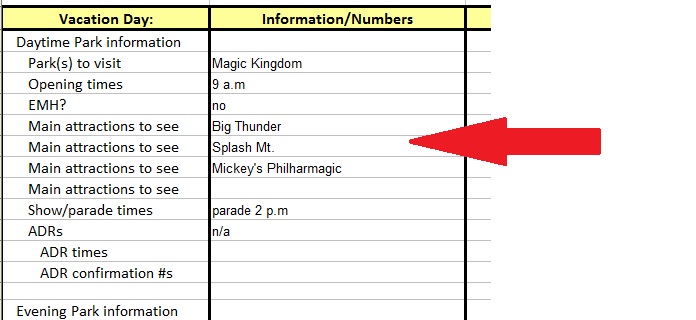
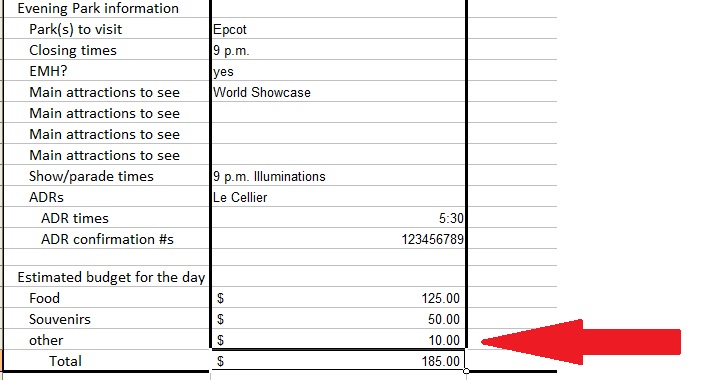
Next come Vacation Days. I made a number of these so you can have one for each day (if you need more days, then just open it a second time). Here you can enter as much information for each day of your Disney vacation as you like. I know many people get involved with touring plans, etc. We have never been quite so formal: Basically I like to know park hours, what is most important for us to see (so we make sure we get to it), any shows or parades if it matters, as well as ADR information. Take the ADR info from the ADR Information Sheet and plug it in here so you have it https://theaffordablemouse.com/wp-admin/post-new.phpwith you. And again, an estimated budget for the day. 🙂
And then lastly is the Departure Day, which is fairly similar to Arrival Day.

Disney Vacation Budget Plan Sheet

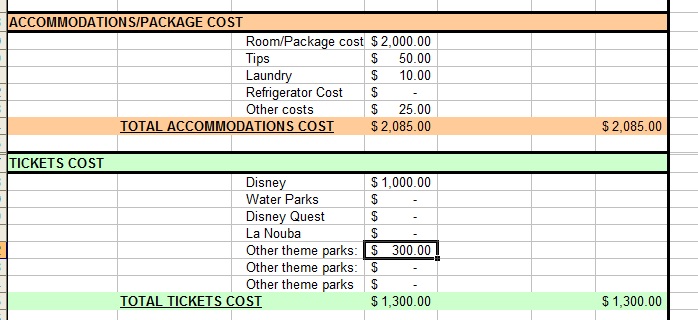
The Disney World Vacation Budget Plan basically covers (hopefully!) just about anything you would conceivably spend money on. There are sections labeled “other” for things not listed. 🙂 The Budget Plan covers Transportation, Accommodations, Tickets, Entertainment, Meals, and Miscellaneous expenses. For every category except Meals, you edit “Column D” by inputting your estimated expenses, and the spreadsheet will subtotal each section for you, and provide you with a total for that entire category:
In the Meals category, you will figure your cost per day (Column B) enter then number of days (Column C), and then Column D will give you the total. There is an area to compute this using the Dining Plan or paying by cash. Important Note: The Cost per adult/day or Cost per child/day for the Dining Plan will be changed to reflect the number of people. You will note the TOTAL amount per day for ALL adults and for ALL children.
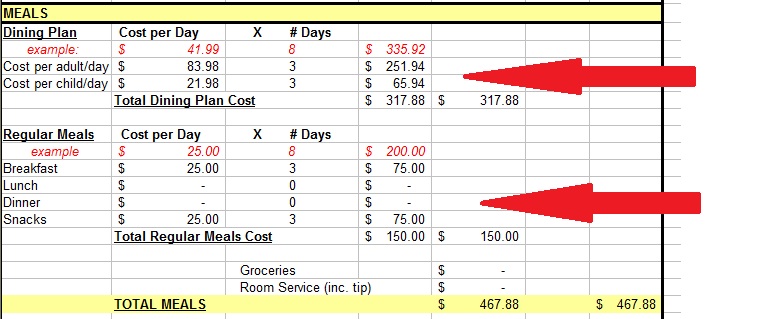
At the very bottom of the sheet, the subtotals for each category will be totaled for a complete Disney vacation budget. 🙂

So there you have it. Hopefully this tutorial will help you to make the most of these Disney planning worksheets. If you have any questions, please ask in the comments, or send me an email at nancy@theaffordablemouse.com.

Happy planning!
Share

An Affordable Disney Vacation Gift for You

I am so excited to have just finished a project that was very important for me to do: a complete, Step by Step Guide to Planning cohdraNKNgft7Affordable Disney Vacations. Fifty pages worth of everything you need to know to get started saving money on a Disney vacation. And it’s FREE! 🙂 A present from me to you…

The main reason I started The Affordable Mouse was to share ways to make Disney affordable…to help folks make a magical vacation for their family possible. This Guide is meant to help you do just that.

My Step by Step Guide is perfect for anyone who is trying to plan their first visit to Walt Disney World….or who wants to know what steps they need to take in order to have an affordable Disney vacation. Basically, I take you by the hand and walk through everything you need to think about, from the very beginning…figuring out when to go….to after you get back and are planning your next Disney trip!

Think this will be a help to you? Sign up to receive Planning Affordable Disney Vacations Step by Step right here. Remember, it’s FREE….from me to you, as a Thank You for being a friend of The Affordable Mouse. 🙂

Have a magical day!

Share

Affordable Disney Vacation Souvenirs: Making Photo Memories

Continuing our discussion of affordable Disney vacation souvenirs, today I want to talk about pictures. Because the photos OrlandoJan08and9 227that you take at Walt Disney World can form the basis for the most special souvenirs that you have. Photos capture memories…and those are truly priceless.
Anyone who visits my home knows within the first 90 seconds that I am picture obsessed. We have photos everywhere….and a significant majority chronicle our Disney vacations. (So that would probably be the second thing that a visitor to my house would learn quickly….that I am Disney obsessed too. 🙂  )

So if you are like me, and love the idea of having your Disney photos be a big part of your souvenirs, then read on for some tips on how to keep those photo memories affordable.

Basically, there are 3 types of photos you will probably be involved with at Disney World: the ones you take, the ones the Photopass photographers take, and the ones that are taken when you go on certain rides.

Tips for Taking Your Own Pictures Affordably

Let’s start with your own pictures. Most people arrive at Disney World, especially on their first visit, with the plan to take lots of pictures. And if you are the way we were on our first trip, we did just that….hundreds in fact. Taking your own pictures is very affordable….provided you do a little planning. The single most important thing you can do here is to be sure to have enough storage chips, and/or a way to download your pictures if you use up your camera’s memory…which you will. And the second thing is to make sure you have extra batteries or rechargeable batteries and a battery charger….and then remember to use the battery charger!

(Trust me on all of these, because I speak from experience. I once missed a picture of my daughter being invited to join the Tapestry of Nations parade by one of the castmembers….because my camera battery chose to die right then and there.)

The thing is, if you want to keep your costs down, you do not want to buy these items at Disney World…because they are a lot more expensive there than at home.

And for making special photo memories, watch for the “Kodak spots” throughout the parks. These are places that are set up for the perfect picture background: be sure to use them! 🙂

Use Photopass for Great Pictures

Now let’s talk about the Photopass photographers. These are the Disney photographers that are around all the parks, ready and waiting to take your picture. They are wonderful folks who specialize in preserving those Disney memories. There is no charge for having your picture taken by a Photopass photographer: you don’t pay until you order prints or a CD with all of your pictures on them. The friendly Photopass folks will also typically be at character appearances, and some restaurants and resorts as well.

I recommend using Photopass as much as possible, because these professionals will take great pictures for you! When you go to the Photopass website later, where you will input your Photopass card number, you will see all of your pictures…and that there are all kinds of great souvenirs that you can have made with your pictures. Just make sure you don’t get carried away with ordering!

It is so nice to have these special pictures done because they become the “formal” pictures I have framed… plus they usually are the only ones with me in them, because I am busy taking all the others. 🙂

Now keep in mind, if you see a great photo opportunity (especially if you are seeing a character) and you want a family photo with everyone, but you DON’T want a Photopass picture…simply give your camera to the photographer, and they will happily take your picture with your camera. No cost there to you at all!

Be Sure to Smile Going Down Splash Mountain

As to ride pictures? These will be taken on most of the “thrill” rides and are always fun to see afterwards. We have gotten a few over the years, but be forewarned…they are not cheap. However, it is kind of fun to see what you look like going down Splash Mountain…so it just might be worth it to you to splurge a little to preserve THAT memory! 🙂

Share

Affordable Disney Vacation Souvenirs: Discover Pin Collecting!

This post is part of the 10th Edition of the Disney Blog Carnival. Be sure to stop by there for more great Disney blog posts!

When it comes to planning an affordable Disney vacation, saving money as many ways as possible is important. So I thought 506625that I would take the next few blog posts to discuss ways to keep your souvenir budget under control. I did a blog post about this in a general way a few months ago, but I thought it might be helpful to look at several ideas in more detail. So today, we’re going to discuss my very favorite Disney vacation souvenir, pins.

How We Discovered Pin Collecting

Disney has been actively promoting pin collecting as a popular hobby for 10 years now. They started it during the Millennium Celebration, and oddly enough, that is when my family started collecting pins! And I have to say, the way we got started was almost accidental…

We traveled to Disney World in the year 2000, and during this trip at the end of June, we experienced the rainiest vacation we have ever spent. Florida is, of course, prone to sudden thunderstorms every day in the summer, but this was different: it didn’t come up quickly, rain quickly and leave….it came up quickly, rained, and stayed. So a lot of the fun parades and outdoor shows were cancelled every night. What to do with all this extra time?

We discovered that all the castmembers were wearing lanyards with these really cool pins on them….and that if you had a pin and you liked one of theirs more…..well, they had to trade with you. How cool is that? Especially if you are 9, as our daughter was at the time.

Pin Collecting and Trading Strategy

But you needed to have some pins first, so we bought a few…and then a few more. There were SO many kinds of pins it was mind boggling and we literally spent hours looking at all of them, trying to decide which ones we liked the most, bought them….and then stupidly traded them away. DOH! (We were kind of slow learners….) Eventually we figured out the trick about this: buy cheap ones that you don’t like as much, and trade them for more “valuable” ones. (Of course everyone defines “value” here differently. For some, it is ones that are literally worth more. For others, it is merely ones that they like better.)

Now the thing is, pin collecting doesn’t have to involve trading, and now ten years later for us, we still collect them, but are not concerned about trading. Pin trading is most popular with children, and I must say it is a lot of fun to see kids bravely ask castmembers to trade a pin with them….and then be delighted when they do!

Set a Pin Budget and Stick to It!

At this point, with hundreds of pins, we limit ourselves to 2-3 pins per trip. Because yes, this CAN be an expensive hobby if you are not careful! While the cost of pins can start as low as maybe $6-8 each, they can go up to $20+ for some very elaborate limited editions. And Disney sells pin sets too, so if you like that idea, you can spend even more.

Keeping Pin Collecting Fun AND Affordable

Which is why this can be a great souvenir and hobby, but you have to set limits and be careful to keep it affordable. With that in mind, and to still have fun with this, I suggest the following.

  1. If you have kids, arrive at Disney with a dozen or so cheap pins for your kids to trade with. You can find some on eBay, on sale at DisneyStore.com, and even Amazon. The idea here is to trade these for others your kids will like more.
  2. Set a limit of so many per day, or per trip, or a cost limit…and then stick to it. It is easy once you start looking at them, to get carried away!
  3. It is easier, in my opinion, to do this if you are collecting with a theme in mind…..which can be just about anything. Maybe the resorts, or characters, or villains, or princesses. You name it Disney’s got a pin for it. Seriously. We now pretty much buy our pins around dated events, as they are a great reminder of when we went and when we got the pin: for example New Years Eve 2005.
  4. Make a conscious decision: collect for fun, collect to trade, or collect seriously. If you have kids who are going to trade everything away, you won’t spend a lot on them, or especially care about what they look like. But if you want to make this a serious collection, you can purchase only Limited Editions, for example, to increase the value of your collection. If this appeals to you, there are some great books that can give you more information and help you make informed decisions.
  5. Think about how you are going to keep them when you get home! Don’t go to all this trouble to buy all these pins and just keep them in a shoebox! Some people frame the lanyards and pins. Some put their pins in a shadow box. Some keep them in a display portfolio or binder.

Pin collecting can be a fantastic hobby and a relatively inexpensive one if you are careful. Even better, it is an affordable way to collect Disney vacation souvenirs…and have a blast doing it! And if you are like us, you will love looking back at them years later and relive the fun we had collecting them!

Share